
View our full pricing page for detailed information.
In addition to our Pro (paid) plans, Eagle Eyes Pilot is also available for free. Anyone can download Eagle Eyes Pilot onto their drone controller or Android device without need for verification and access several useful features at no cost. For details, see our pricing page.
All prices are in USD for an annual subscription. No auto-renewals
* A verified account is required to purchase a license. Account verification can take 1-3 business days.
* A purchased license can be used on any supported device (Pilot or Mirada). Once a device is activated using a license, the device becomes permanently linked to that license and cannot be replaced with a different device. If you need to switch your license to a different device please contact info@EagleEyesSearch.com.
Yes, we offer a 30-day free trial of the SAR license. You can request a trial here.
Yes, you can run both the Beta and Stable versions of Eagle Eyes on the same device under a single license, since licensing is per device, not per app version.
The Beta version has a yellow eagle eye logo and the Stable version has a blue eagle eye logo:
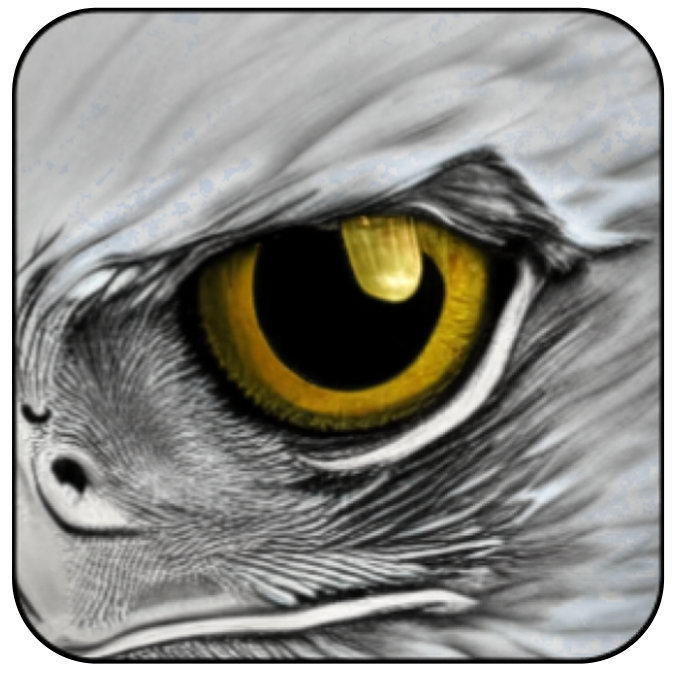
BETA
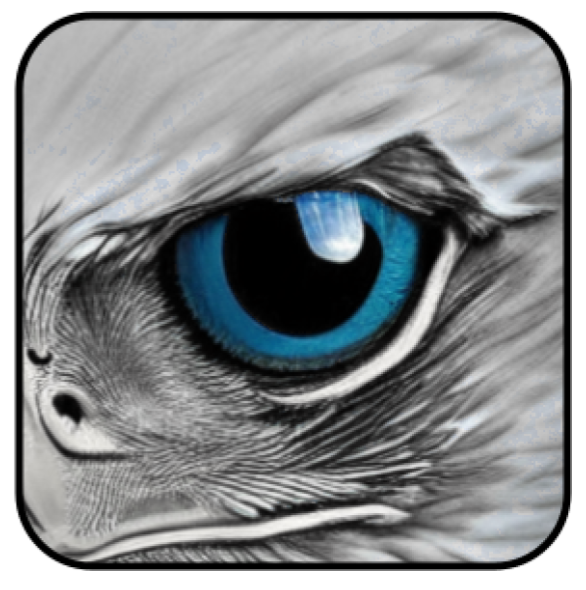
STABLE
At Eagle Eyes, we release Beta versions early to gather real-world feedback and accelerate improvements, though bugs are expected. For mission-critical work, we recommend having both installed. If the Beta causes issues, you can easily switch back to the Stable version.
You can download both versions here.
Contents
→ System requirements for Eagle Eyes Pilot
→ System requirements for Eagle Eyes Mirada
📋 See our compatibility page for the full table of supported drones, controllers, and devices.
System requirements for Eagle Eyes Pilot
Eagle Eyes Pilot runs on Android devices (e.g., Galaxy S10 or newer) running Android 8+ and compatible with DJI SDK-4 or SDK-5, plus at least 2GB of free storage. It can also run on compatible DJI controllers.
System requirements for Eagle Eyes Mirada
Key points:
| Spec | Requirement |
|---|---|
| Operating System |
MacOS: Apple Silicon Macs (M1 or newer). There is no Intel Mac build of Mirada: on an Intel Mac, use the Mirada web app or our legacy desktop app Eagle Eyes Scan. Windows: Windows 10 and 11 (64-bit) |
| Web app | Runs in a modern desktop browser. Best for viewing and reviewing cases: detection, live streams, and offline use need the desktop app. |
| Drone compatibility |
Eagle Eyes Mirada is drone-agnostic: it works on recorded footage from any drone, and can livestream from any drone with a controller capable of outputting raw HDMI video (with no control overlays). Mirada reads flight metadata from DJI (both .SRT files and telemetry embedded in the video), Autel, Skydio, Wingtra, and Parrot imagery. |
| Memory (RAM) | We recommend at least 8GB of RAM, 16GB is better. |
Eagle Eyes Pilot 1.5.0 - Full Walkthrough
Eagle Eyes Pilot is an app for first responders that runs on DJI drone controllers and Android devices. It has built-in computer vision optimized for search and rescue. and it integrates the drone with ground operations by connecting to CalTapo for real-time mapping. More recent additions include airspace awareness and live streaming, which we cover in separate videos.
Eagle Eyes Pilot
Eagle Eyes Pilot is an all-in-one drone app for Search and Rescue that detects color and motion anomalies in real time, and streams images and the live drone track directly to the team's CalTopo map, while the drone is still in the air.
Eagle Eyes Mirada Beta - Full Walkthrough
Eagle Eyes Mirada is our app for analyzing drone imagery, after the flight and in real time. Import an SD card or folder and Mirada organizes photos, video, 360 captures, and orthomosaics into a case, places everything on a 2D/3D map, and runs the Eagle Eyes detector on visual and thermal imagery. Review detections in the Mosaic view, bookmark clues with a single keystroke, sync bookmarks and flight paths to CalTopo, export georeferenced PDF reports, and follow live drone feeds and livestreams from Eagle Eyes Pilot.
Mirada runs as a desktop app on Windows and MacOS (recommended for search work: detection, live HDMI streams, SD card import, and full offline operation), and as a web app in the browser for viewing and case review. It is currently in Beta. Download it here.
What happened to Eagle Eyes Scan? Mirada replaces our previous desktop app, Eagle Eyes Scan, and does everything Scan did. Scan is still available to download for existing users, but it is no longer maintained. Your Eagle Eyes license works for both: a device slot can be used for Mirada just like it could for Scan. FAQs on this page that only apply to Scan are marked as legacy.
Contents
→ How does Eagle Eyes Livestreaming work?
→ How do I start a livestream?
→ How do viewers open the livestream?
→ What does the Eagle Eyes Viewer show?
→ When are credits used?
→ What happens if credits run out?
How does Eagle Eyes Livestreaming work?
Eagle Eyes Livestreaming lets you share your drone's live video, detections, and map information with viewers on mobile or desktop. Viewers can watch in two ways:
How do I start a livestream?
From the Eagle Eyes Pilot home screen, tap the Live Stream card. If you are already in fly mode, tap the livestreaming icon at the top of the screen, or go to Menu → Livestreaming → Livestreaming (Beta). Then tap Start Streaming and wait for it to connect — a QR code and link will appear on the controller screen.
How do viewers open the livestream?
Viewers can:
In CalTopo, click on the drone on the map, then select the livestream option. The livestream opens in a new browser tab.
What does the Eagle Eyes Viewer show?
The Eagle Eyes Viewer shows a split-screen with the live drone video on one side and a synced map on the other. The map shows the drone's location, altitude, orientation, and connected CalTopo map features. The viewer can also show detections from Eagle Eyes Pilot, so viewers can follow detected objects alongside the live drone feed and map. Both the video and map panels can be expanded to full screen, and a quick link to the current CalTopo map is included.
Opening a livestream from CalTopo and viewing detections in the Eagle Eyes Viewer.
Livestreaming is currently in beta. The livestreaming feature is included with Eagle Eyes Pro licenses, but remote viewing over the internet uses livestreaming credits.
When are credits used?
Credits are only used for remote viewing over the internet. You are charged only while at least one remote viewer is actively watching — if nobody is watching remotely, or everyone watching is on the same local Wi-Fi network as the controller, no credits are used. Local Wi-Fi viewing never uses credits.
What happens if credits run out?
Remote internet viewing stops until you top up your balance, but local Wi-Fi viewing keeps working for free, even with a zero credit balance. While streaming, Eagle Eyes Pilot shows your credit balance and whether your current stream is using credits or streaming for free. For best results, use a stable internet connection such as Starlink, Wi-Fi, or a strong mobile hotspot.
Please reach out at info@EagleEyesSearch.com
Contents
→ What are flight missions?
→ Which mission type should I use?
→ Line & Corridor missions
→ Grid missions
→ Setting grid parameters
→ Review, fly, or export
→ Saved missions
→ Processing the imagery afterward
What are flight missions?
Flight missions are available in Eagle Eyes Pilot 1.7.1 and up. They let the drone fly a search pattern automatically and capture photos or video as it goes, instead of flying every pass by hand. You plan the mission on the map, review the preview, and launch.
Why fly an automated mission:
Which mission type should I use?
Eagle Eyes supports the following flight mission types:
Line & Corridor
Grid
Line & Corridor missions
A Line mission flies a single path along a feature. A Corridor mission flies parallel passes on either side of that feature for wider coverage. Both are based on a line drawn in the Eagle Eyes Pilot app or imported from CalTopo, and both support photo and video with configurable overlap.
Building a Line or Corridor mission
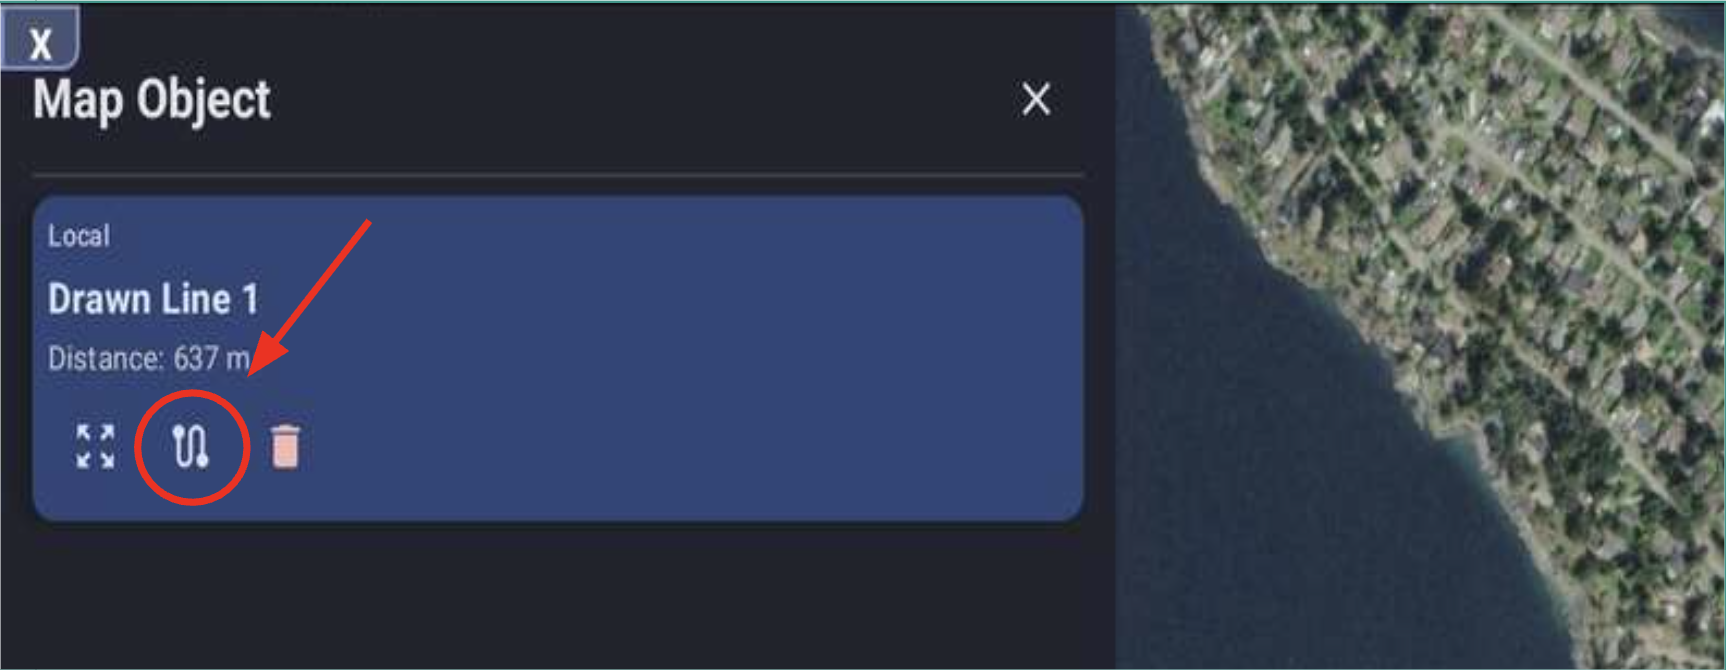
Open a line mission: tap a line on the map, then the line-mission icon.
Grid missions
A Grid mission flies back-and-forth parallel passes to cover an area uniformly. It is based on a polygon drawn in the app or imported from CalTopo. If you need to draw one, tap the draw tool, sketch the polygon, tap Finish, name it, choose whether to upload it to CalTopo, and save.
Building a Grid mission
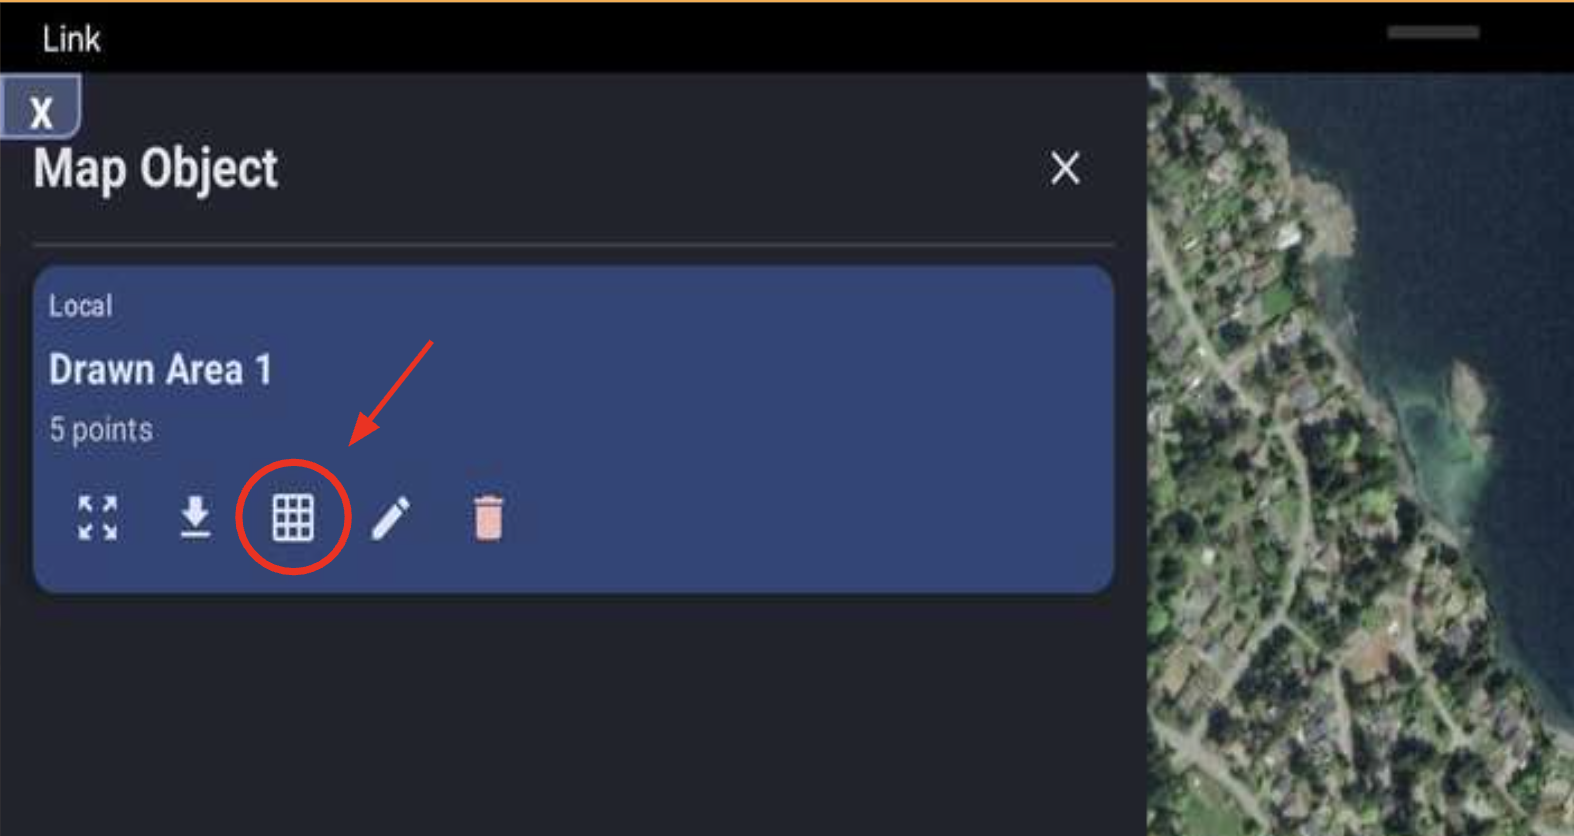
Open a grid mission: tap a drawn area, then the grid icon.
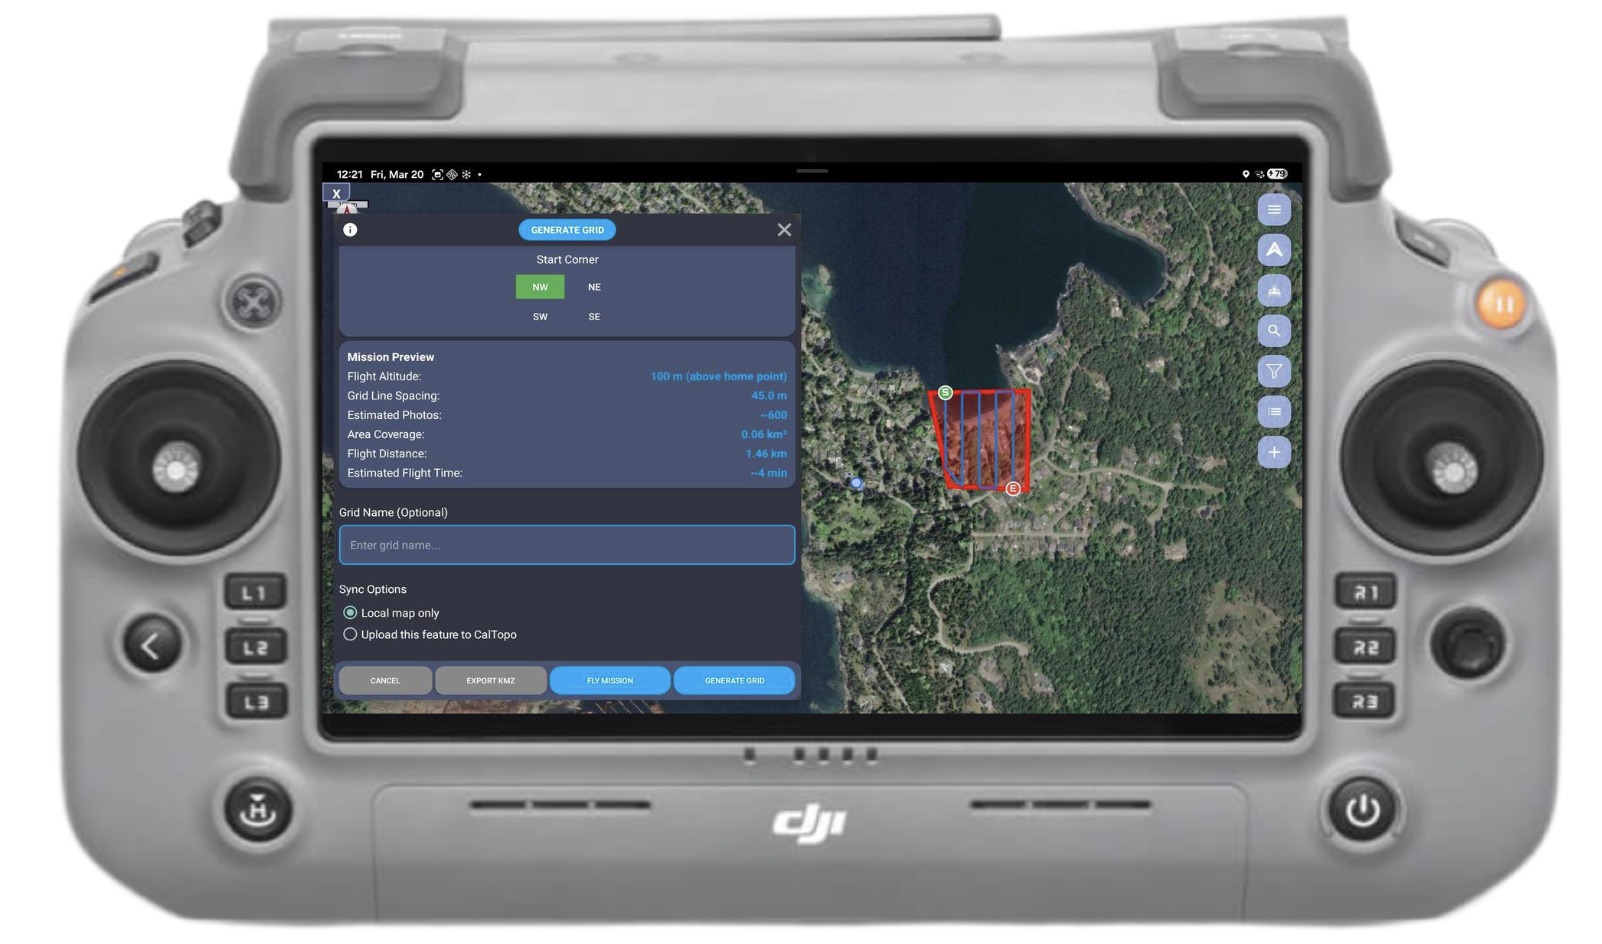
The Generate Grid dialog, with a live mission preview.
Setting grid parameters
Fine-tune the pattern with grid line spacing, overlap percentage, IR camera, grid orientation, and the start corner (NW, NE, SW, or SE). The Mission Preview updates in real time as you adjust, showing flight altitude, estimated photos, area coverage, flight distance, and estimated flight time.
Review, fly, or export
When the pattern looks right, you have three options:
While the mission flies itself, you or a teammate can watch the feed and the map for detections as coverage proceeds.
Saved missions
Missions you create are saved so you can return to them later.
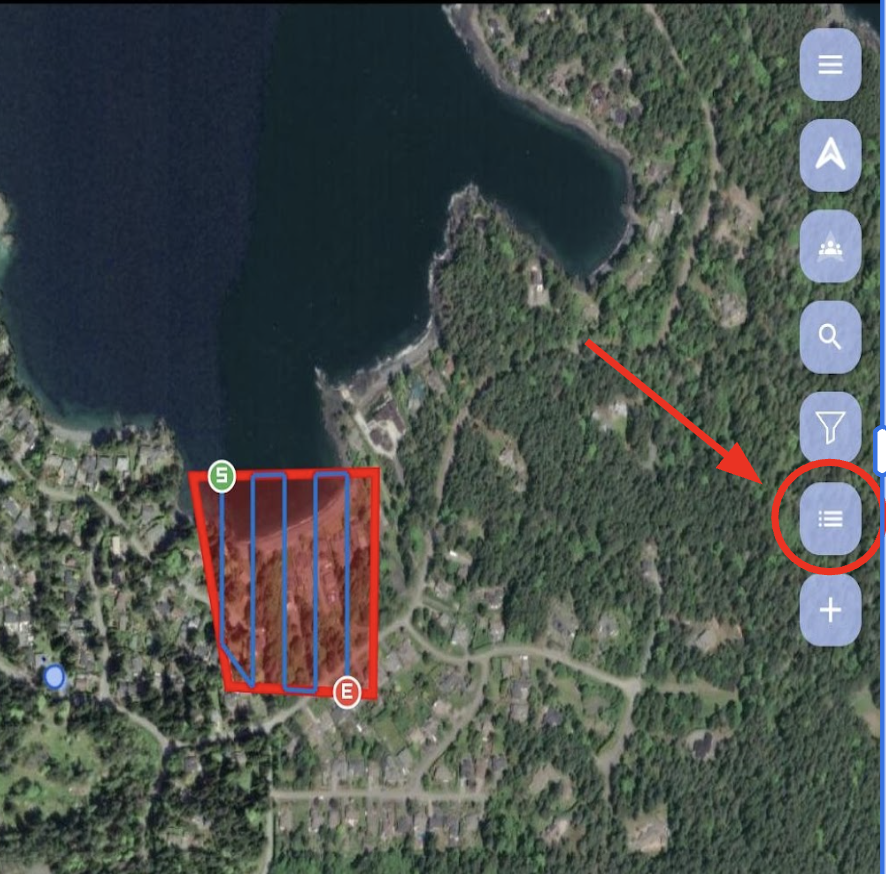
Find saved missions in the map toolbar.
Processing the imagery afterward
To review all the imagery a grid mission captures, process it after the flight in Eagle Eyes Mirada.
How device transfers work
Eagle Eyes licenses are largely device-locked. Once a license is activated on a device, that license is tied to that device until the license expires, and that device slot cannot be used on another device. In other words, you cannot freely rotate a single license between different devices.
That said, limited device rotation is allowed when a device needs to be replaced, such as when you swap to a new controller. Each device slot can be transferred up to twice over the license term, so a license with 4 device slots allows up to 8 device transfers in total (4 slots × 2).
Reinstalling the Eagle Eyes app on the same device does not use a transfer. The app reuses the existing slot when it reactivates. Only disconnect a device when the license needs to move to a different physical device, such as replacing a controller, resetting a device to factory defaults, or moving a device between users.
How to disconnect a device from a license
Before you confirm, the page shows how many transfers are left on that slot. Once you disconnect, the slot is freed and a different device can activate the license in its place.
You can use Eagle Eyes Pilot and Mirada together. The benefit is that you will be able to transmit live video and live coordinates to a nearby laptop for analysis. You can do this by either piloting the drone directly in Eagle Eyes Pilot, or by flying with DJI Pilot 2 while running Eagle Eyes Pilot in the background. Connect the controller to your computer using an HDMI cable and capture card for the video feed, while live coordinates are transmitted wirelessly.
You don't need to run Eagle Eyes Pilot on the controller to get a live feed into Eagle Eyes Mirada. But doing so enables live coordinate transmission, which lets Mirada show the drone's live position and track on its map.
Alternatively, you can skip the HDMI cable entirely: start a livestream in Eagle Eyes Pilot and open it in Mirada. On the same Wi-Fi network this is free of charge; over the internet it uses livestreaming credits. See how livestreaming works. Mirada can follow multiple drones live on its map at the same time.
The video below explains the setup and process.
This video shows Eagle Eyes Pilot with our previous desktop app, Eagle Eyes Scan. The setup works the same with Mirada.
Background Mode lets Eagle Eyes Pilot run alongside the DJI Pilot 2 or DJI Fly app, so you can fly with DJI's controls (waypoint missions, advanced flight features, etc.) while Eagle Eyes continues to broadcast telemetry, sync to CalTopo, and livestream in the background. Detection does not run in Background Mode. To run detection you have to turn off Background Mode and use Eagle Eyes Pilot as your main piloting app, which requires a Pro Eagle Eyes license and a compatible DJI drone (see the compatibility overview).
Walkthrough video
| Feature | Status |
|---|---|
| Detection | ❌ Requires Eagle Eyes as the main piloting app |
| Telemetry broadcast | ✅ Full functionality |
| CalTopo sync | ✅ Full functionality |
| Livestreaming | ✅ Via screen capture |
| Camera / gimbal control | ❌ Controlled by the DJI app |
| Flight missions | ❌ Use the DJI app |
For more detail, see the Advanced Features training module.
Background Mode is available on the Free tier. You can get a Free license instantly during in-app setup, with no approval wait, and Background Mode is on by default: install Eagle Eyes Pilot, complete the in-app setup, and you're ready to fly in your DJI app. Pro users toggle it manually with the steps above.
Contents
→ Livestreaming from Eagle Eyes Pilot (no cables)
→ Wired HDMI into Eagle Eyes Mirada
→ Adding live telemetry
Livestreaming from Eagle Eyes Pilot (no cables)
The easiest way to watch and analyze live drone video in Mirada is Eagle Eyes Livestreaming, with no cables needed. Start a livestream in Eagle Eyes Pilot on the drone controller, then open it in Mirada: click "+" and choose Wireless Livestream, or open the shared link or QR code. Watching on the same local Wi-Fi network is free of charge; remote viewing over the internet uses livestreaming credits. See how livestreaming works with Eagle Eyes.
Mirada can follow multiple drones live on its map and jump between their streams. On the desktop app you can also record streams and run the Eagle Eyes detector on them as they come in, and scrub back in time while the stream is still live.
Multi-drone coordination and livestreaming in Mirada.
Wired HDMI into Eagle Eyes Mirada
The Eagle Eyes Mirada desktop app also supports "wired" live-streaming from the drone to your laptop or desktop via HDMI. This allows teams to watch a live drone feed on larger displays, record the footage as it comes in, and see detections in real-time. You can pause at any time, go back to a specific frame or detection, then jump back into the live feed, without interrupting the flow of the pilot.
Required equipment
To set this up, you need to send an HDMI feed from your drone controller into a laptop or desktop computer running the Eagle Eyes Mirada desktop app. This means you need:
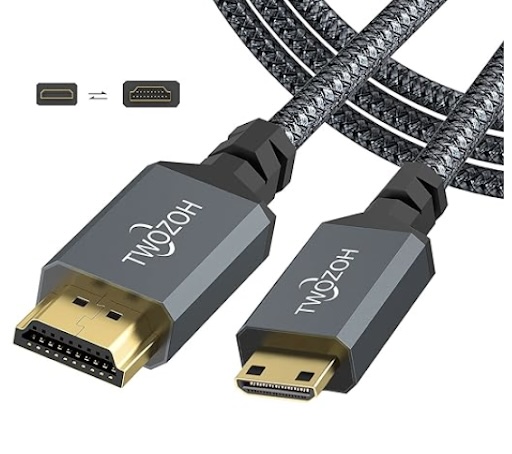
Mini-HDMI to HDMI
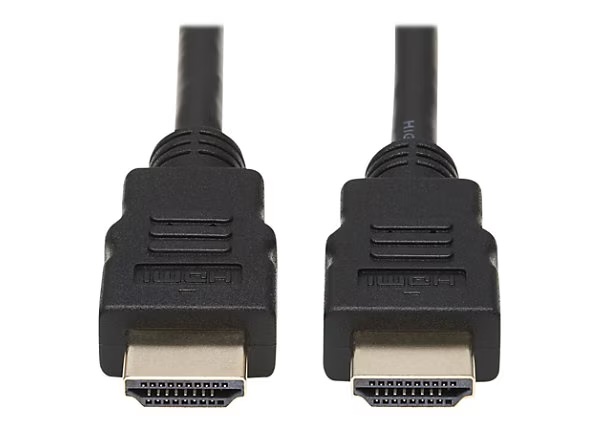
HDMI to HDMI
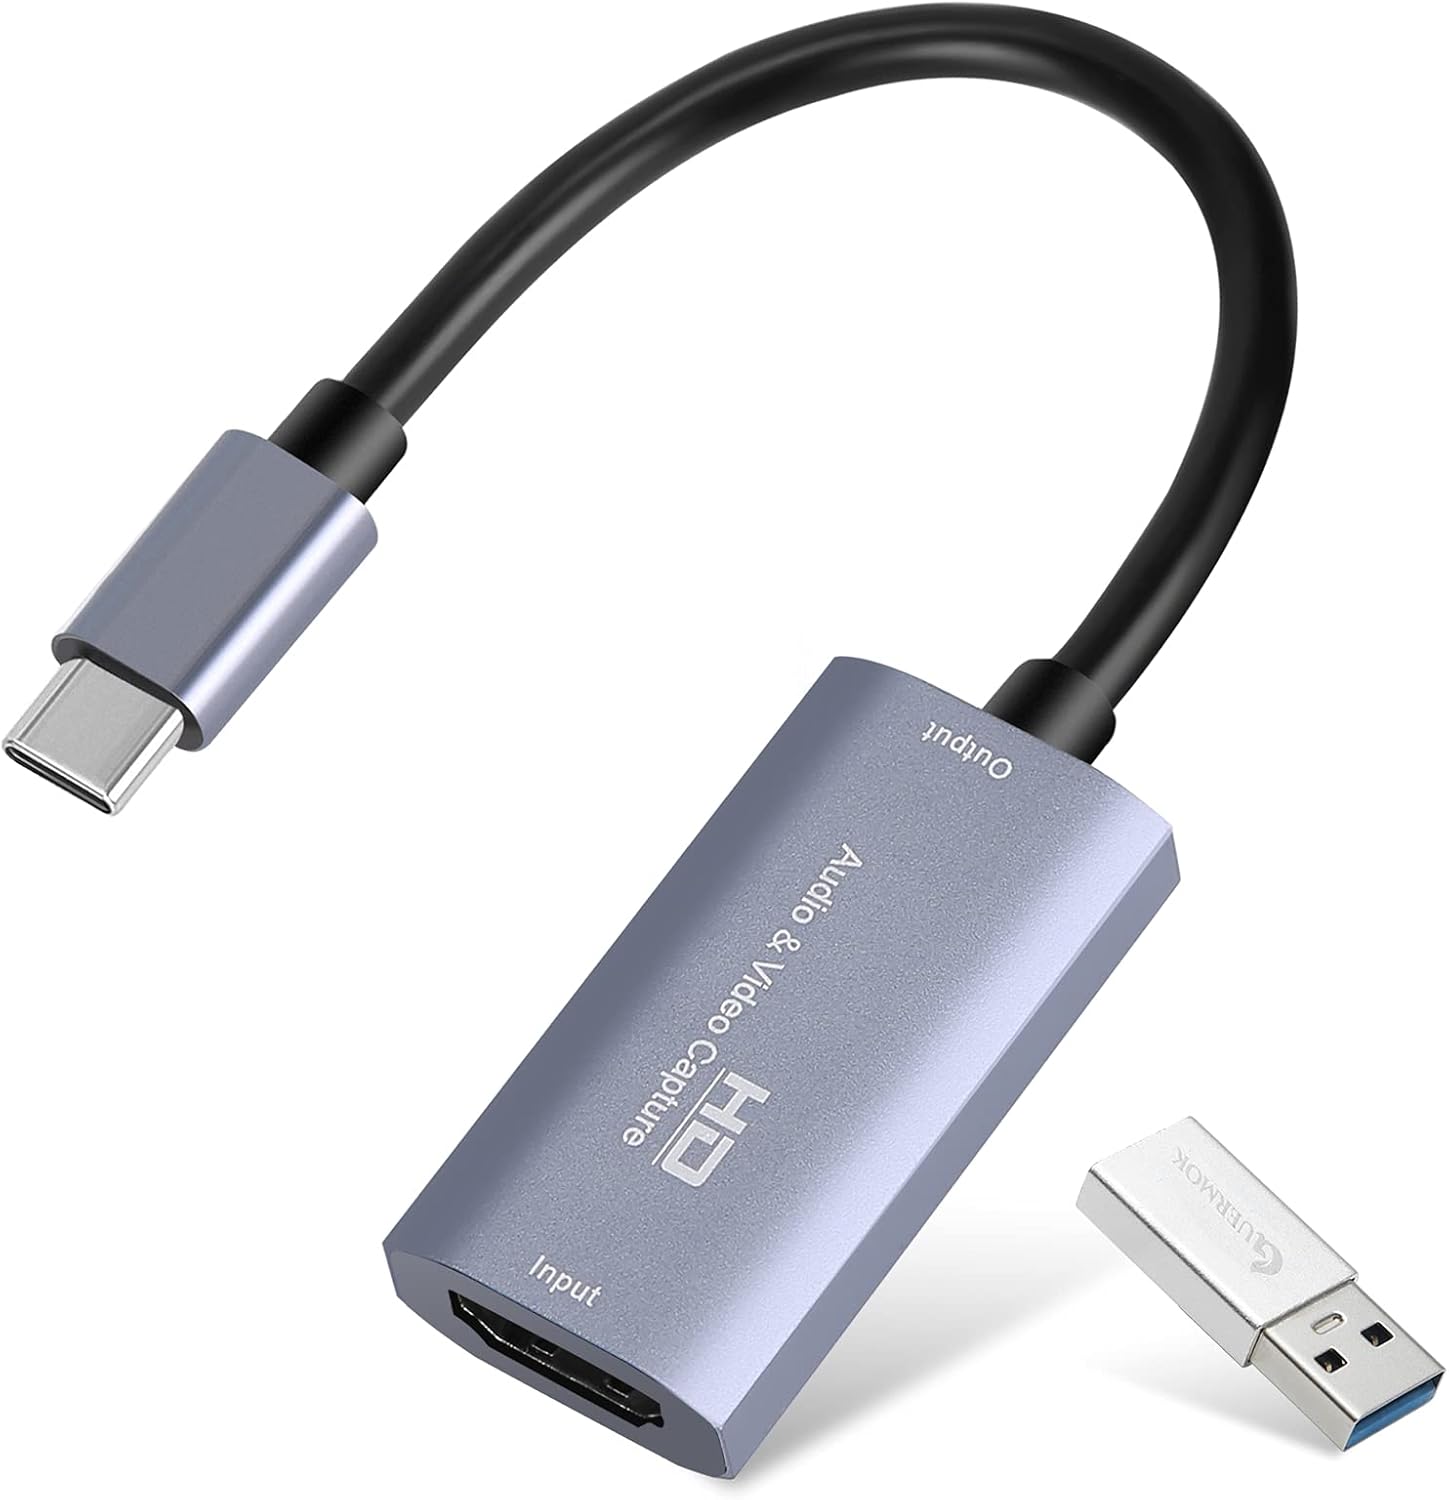
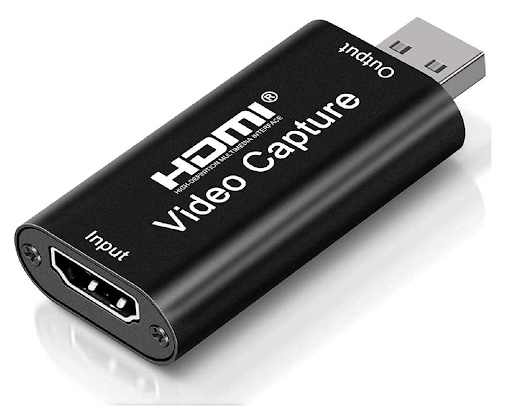
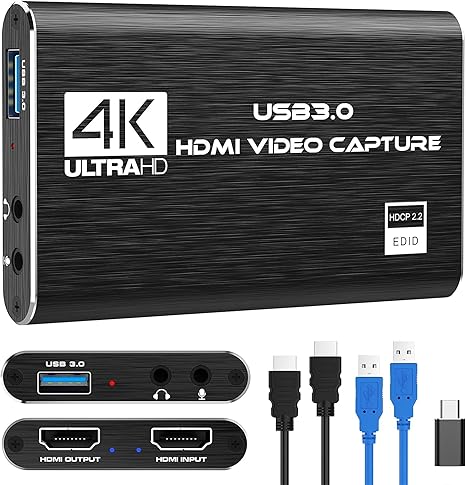
HDMI capture cards come in various shapes and sizes. Most cards will work with Eagle Eyes Mirada.
Getting a clean HDMI feed
For best detection results, send a clean HDMI feed (no overlays) from your drone controller. Overlays can distract the detector. See how to get clean HDMI output from your controller for instructions using a specific DJI controller as an example. If you cannot fully remove the overlays, you can set a detection region in Mirada so detection only runs on a clean part of the frame (see below).
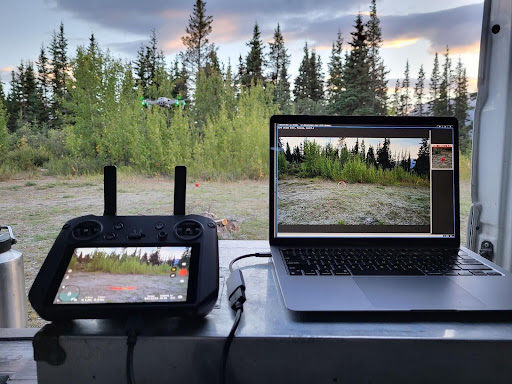
Live streaming setup
Connecting, recording, and running the detector
Open the Eagle Eyes Mirada desktop app and plug in your capture card. Mirada detects the new video source automatically and opens the Connect to Livestream dialog on the Wired tab, with a live preview. (You can also open this any time via "+" → Wired Livestream.) Select the source coming from the drone, make sure a case is selected, and set two options before connecting:
Then click Connect. You can change these options later with the Record / Detect button in the playback controls, or by right-clicking the stream in the sidebar and choosing Enable Recording / Detection. With detection enabled, the same dialog offers Optional: Set Detection Region: drag a rectangle on the preview to run detection only on a clean part of the frame.
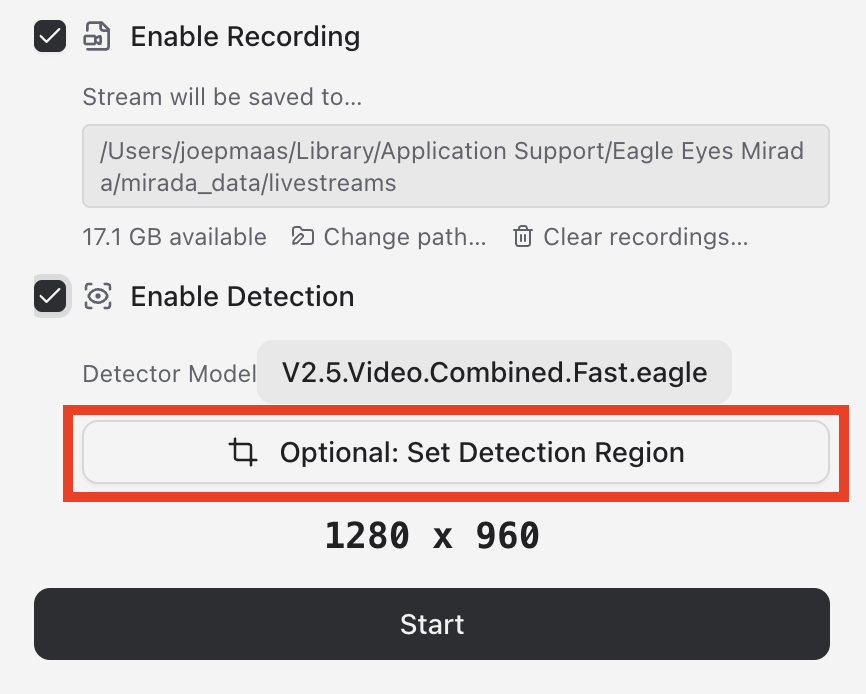
The Recording and Detection options, with the Set Detection Region button.
While watching, press space to pause and resume, Z/X to zoom in and out, C to reset zoom, F for fullscreen, and R to jump back to real time.
Troubleshooting
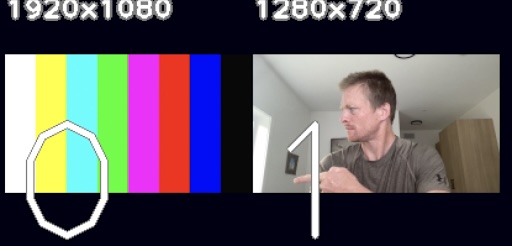
The "rainbow of death" HDMI display issue
Adding live telemetry
To see the drone's live position and track on the Mirada map alongside the video, run Eagle Eyes Pilot on the drone controller, on the same local network as your computer. Pilots can fly with Eagle Eyes Pilot as their piloting app, or run it in Background Mode while flying with the drone manufacturer's own piloting app. Background Mode supports a wider range of drones, including Autel: see the compatibility overview.
Yes. There are a few ways to combine flying with your DJI app and running the Eagle Eyes detector:
1. Fly with Eagle Eyes Pilot. The detector runs live on the drone controller while you fly. If you took off with your DJI app, you can switch to Eagle Eyes Pilot mid flight, while the drone is in the air:
2. Fly with your DJI app and run detection in Eagle Eyes Mirada. Run Eagle Eyes Pilot in Background Mode behind DJI Pilot 2 and start a livestream. In the Eagle Eyes Mirada desktop app you can record the incoming livestream and run the Eagle Eyes detector on it as it comes in. And when you fly with Eagle Eyes Pilot instead, Pilot sends its own detections along with the livestream, so viewers in Mirada see them live. You can also go wired: connect the controller to a laptop with an HDMI cable and capture card and run detection in Mirada. See how to analyze live video in Mirada.
Livestreaming with detections, from the Eagle Eyes Pilot 1.7.1 walkthrough.
Yes, Eagle Eyes Mirada (our desktop app) can run real-time computer vision on any HDMI input.
The best setup is to send a clean HDMI feed (no overlays) from your drone controller into a laptop running Eagle Eyes Mirada, overlays can distract the detector. See How do I use Eagle Eyes Pilot and Mirada together.
If your pilot app or drone can't output a clean HDMI video feed without screen/pilot display overlays, you can draw a crop region in Eagle Eyes Mirada to limit detector distractions and only run the computer vision detector on a clean part of the frame. When you enable detection on a livestream, you will see the option Optional: Set Detection Region: click it and drag a rectangle over a clean part of the frame.
The Recording and Detection options in Eagle Eyes Mirada, with the Set Detection Region button.
You can also process any recorded image or video with Eagle Eyes Mirada. See processing image sets for details.
Yes, you can switch between apps midflight.
From Eagle Eyes Pilot → DJI Pilot:
Use the in-app shortcut: Settings (hamburger menu, top-right) → Switch to DJI app.
From DJI Pilot → Eagle Eyes Pilot:
If you previously opened Eagle Eyes Pilot during this session, you can return to it by pressing the back button on the controller. It may take a few presses depending on what you did in DJI Pilot 2.
You can also swipe up on the screen at any time and toggle between apps manually.
We've seen that on the M30T and M350, the video occasionally does not load on startup - the user gets a black screen after clicking "Fly".
This may be fixed by switching to the DJI app and back, or by rebooting the RC controller. You can always fall back on the standard DJI piloting app if it persists.
If you are getting this issue, you can report it to info@EagleEyesSearch.com along with any relevant info (drone, controller, Eagle Eyes version, etc).
Eagle Eyes Mirada runs on both Windows and MacOS. On Mac, the desktop app supports Apple Silicon devices (M1, M2, M3, or M4 chipsets). There is no Mirada desktop build for older Intel-based Macs: on those, you can use the Mirada web app in the browser, or our legacy desktop app Eagle Eyes Scan, which still offers an Intel (x86) distribution.
iPhone and iPad: yes, the Mirada web app also works in the browser on phones and tablets, with a slightly more limited feature set: for example, the Eagle Eyes detector currently runs only in the desktop app.
Eagle Eyes Pilot does not support iOS (iPhones, iPads) because DJI dropped iOS SDK support. Find more information in the 📘 Eagle Eyes Pilot Manual.
Yes. Eagle Eyes Pilot and the Eagle Eyes Mirada desktop app work completely offline: you can import footage, run the detector, review detections, bookmark, and export without an internet connection. You only need to be online once, to activate your license on the device, and for optional online features such as CalTopo sync and livestream sharing.
Note that the Mirada web app runs in your browser and needs an internet connection to load. For offline use in the field, choose the Mirada desktop app.
In order to capture the drone's GPS track alongside recorded video footage in DJI Pilot 2, which allows Eagle Eyes Mirada to geolocate frames in your video, extract GPS tracks for upload into CalTopo (see also: uploading offline GPS tracks to CalTopo), and display the drone's location on the Eagle Eyes Mirada map, you need to enable video captions (.SRT files) in the DJI Pilot 2 settings.
See this video for instructions on turning on video captions:
When video captions are enabled, DJI Pilot 2 records a .SRT file alongside each .MP4 video file. It is essential to load both the .SRT and .MP4 files into Eagle Eyes Mirada. This ensures GPS data is extracted and each video frame is properly geolocated.
Note: some newer DJI models, like the Matrice 4 series, embed telemetry inside the MP4 file instead of writing a separate .SRT file. Eagle Eyes Mirada reads this embedded telemetry directly. See geolocation data from Matrice 4 series video files.
Eagle Eyes Pilot is compatible with DJI drones that support the DJI Mobile SDK 5, and can also run in a limited "Background mode" (see below) on most DJI and Autel drone controllers that support 3rd party apps.
Eagle Eyes Mirada (the successor to our previous desktop app, Eagle Eyes Scan) can process recorded images and video from any drone, and can also run real-time detection via HDMI input from controllers that support clean HDMI output.
📋 See our compatibility page for desktop hardware and computer system requirements.
This table shows the compatibility of Eagle Eyes Pilot and Eagle Eyes Mirada for each drone/controller combination. See the legend below the table for what each status means.
📱 Android Requirements: Android 8+ with processor comparable to Snapdragon 855 (Galaxy S10 level), 6GB+ free storage. Not compatible with Google Pixel 6/7 phones due to DJI SDK bug.
For more information on Compatibility see 📘 Eagle Eyes Pilot Manual.
Sources:
Yes, Eagle Eyes Mirada can be used on live footage from manned aircraft.
Several teams use Eagle Eyes for live color detection on helicopters and other manned aircraft. This blog post highlights one of their setups using custom-mounted GoPros.
All you need is an HDMI video signal that can be fed into a laptop or Windows tablet onboard the aircraft. Plug the capture card into your computer and Eagle Eyes Mirada will automatically detect the HDMI livestream and offer to connect to it.
Yes. Our drone app, Eagle Eyes Pilot, runs in "Background mode" on most Autel controllers that support 3rd party apps, giving you the detector on the live feed. Full integration, where Eagle Eyes Pilot also flies the aircraft, is currently DJI only, via the DJI Mobile SDK 5.
Our desktop app, Eagle Eyes Mirada, can also be used with Autel drones. With a few considerations.
⚠️ Note: We haven't tested Eagle Eyes extensively on Autel drones yet. We strongly recommend trying the setup with your own Autel drone before purchasing a license to ensure compatibility with your specific model and controller setup.
You can analyze imagery and video captured by your Autel drone, including location data for each frame.
You can connect your Autel controller or Live Deck to your computer using an HDMI cable and capture card. For best results, ensure you have a clean HDMI feed (no on-screen controls). There are two ways to achieve this:
If you can't fully remove the overlays, it's still possible to run detections on a rectangle in the screen that doesn't contain overlays. When starting the detector on a live feed, Eagle Eyes Mirada lets you draw a crop region, so detection only runs on a clear part of the frame, excluding the area with controls.
The Recording and Detection options in Eagle Eyes Mirada. Click Optional: Set Detection Region and drag a rectangle over a clean part of the frame.
📍 Note: Eagle Eyes Mirada can process live video from an Autel drone, but live coordinates are not displayed. Coordinates are only available when working with pre-recorded footage and flight logs.
⚠️ Note: We haven't tested Eagle Eyes extensively on Skydio drones yet. We strongly recommend trying the setup with your specific Skydio model before purchasing a license to ensure compatibility with your specific model and controller setup.
You can analyze imagery and video captured by your Skydio drone.
You can connect your Skydio controller to your computer using an HDMI cable and capture card. For best results, ensure you have a clean HDMI feed (no on-screen controls / heads-up display), so the color/motion detector doesn't get triggered by the overlays.
If you can't fully remove the overlays, it's still possible to run detections on a rectangle in the screen that doesn't contain overlays. When starting the detector on a live feed, Eagle Eyes Mirada lets you draw a crop region, so detection only runs on a clear part of the frame, excluding the area with controls.
The Recording and Detection options in Eagle Eyes Mirada. Click Optional: Set Detection Region and drag a rectangle over a clean part of the frame.
📍 Note: Eagle Eyes Mirada can process live video from a Skydio drone, but live coordinates are not displayed. Coordinates are only available when working with pre-recorded imagery.
While the detection system is primarily designed for detecting color and motion anomalies, it can work on thermal. It's good at picking out motion on thermal when the drone is stationary. The detector will also tend to pick out small objects that are warmer than the surroundings.
See the 📘 Eagle Eyes Pilot Manual for more details.
The motion detector depends on having a stable background. Even small background movements (from wind, joystick input, or shifting water surfaces) can cause the system to reduce or temporarily disable motion detection to avoid false alerts.
Another factor is scene complexity. Since the detector can highlight a maximum of three anomalies per frame (color and/or motion combined), a large number of color anomalies can drown out motion detections. In cluttered or highly colorful scenes, the detector may prioritize color contrast over movement.
If you want to focus purely on movement, you can switch to a detector with motion-only detection:
V2.5.Video.Motion). For recorded footageThis disables color analysis and helps the motion detector perform more reliably in complex visual environments.
💡 Tip: Motion detection works best when the drone is completely stationary. Any camera movement will reduce the detector's ability to identify moving objects.
The Eagle Eyes computer vision system enables real-time detections on your live drone feed. This means you can look back over areas you've flown and review all the images that triggered a detection helping hone in on clues identifying things that might otherwise be overlooked. The detector can be run on recorded footage from any drone, any image or any video file. For more information on how the detector works, see here.
The intended way to review detections after the fact is by running the detector on recorded footage in Eagle Eyes Mirada. Load your imagery, run the detector, then open the Mosaic view: every detection appears as a thumbnail, sorted by confidence, time, or color, so the most promising clues surface first. Click any thumbnail to inspect the full frame, and bookmark anything worth a second look with a single keystroke (press B). Bookmarks and detections can be uploaded to your CalTopo map or included in a PDF report.
Detections are leads, not necessarily conclusions: Mirada puts candidate clues in front of a human, it doesn't decide for you.
Running the Eagle Eyes detector and reviewing detections in Mirada.
It is also possible to review past detections directly in Eagle Eyes Pilot, although this is not the recommended workflow. To do this, either tap the three dots (⋯) button on the bottom right of the main landing screen in Eagle Eyes Pilot. Then select View Past Detections:
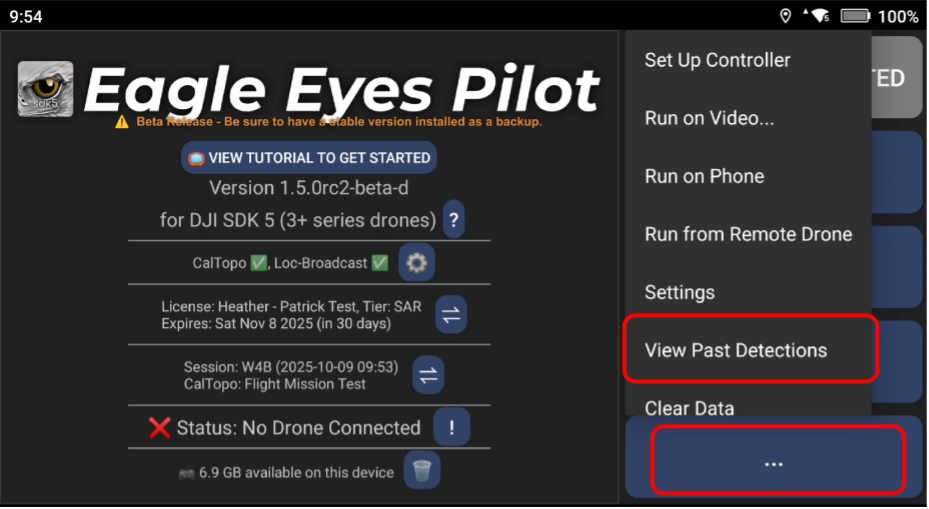
Or access the detections view from within the piloting screen by long-pressing the film roll icon next to the camera photo point marker button:
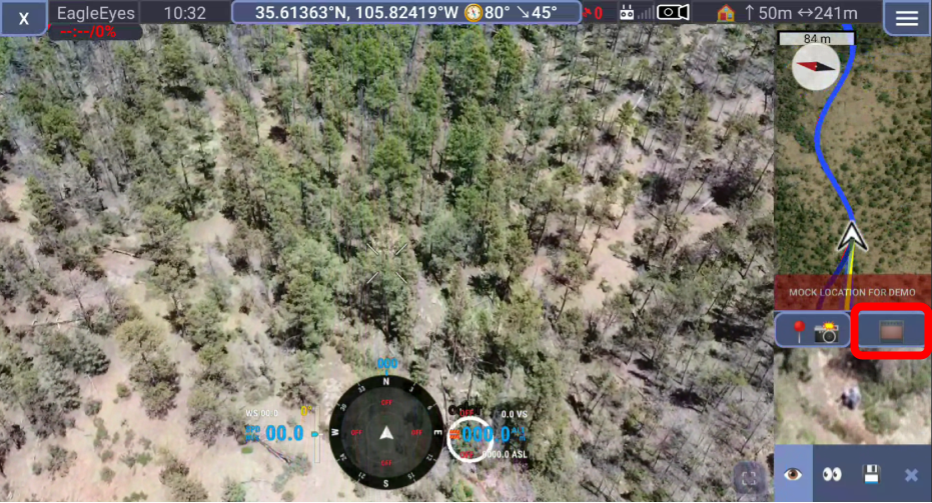
That will bring you to the detections page in Eagle Eyes Pilot:
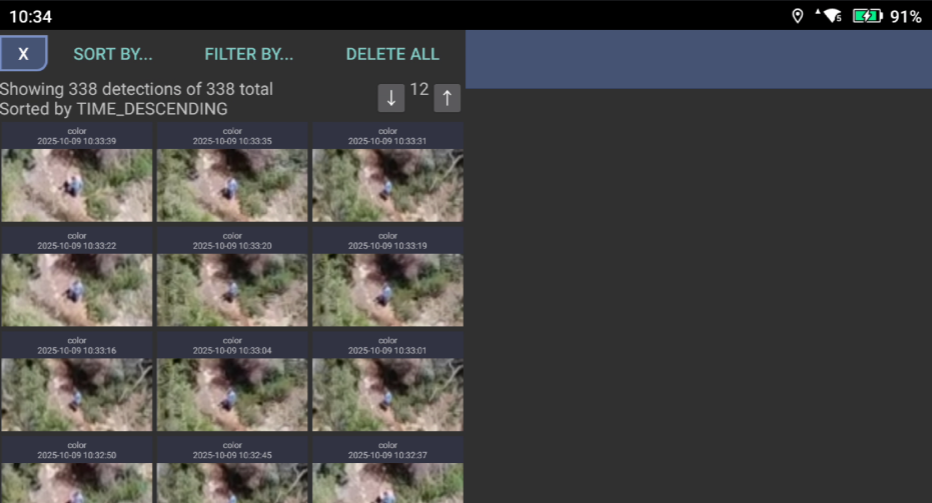
From the detections page, you can filter results by session or remove all filters to display all detections stored on your device from previous flights.
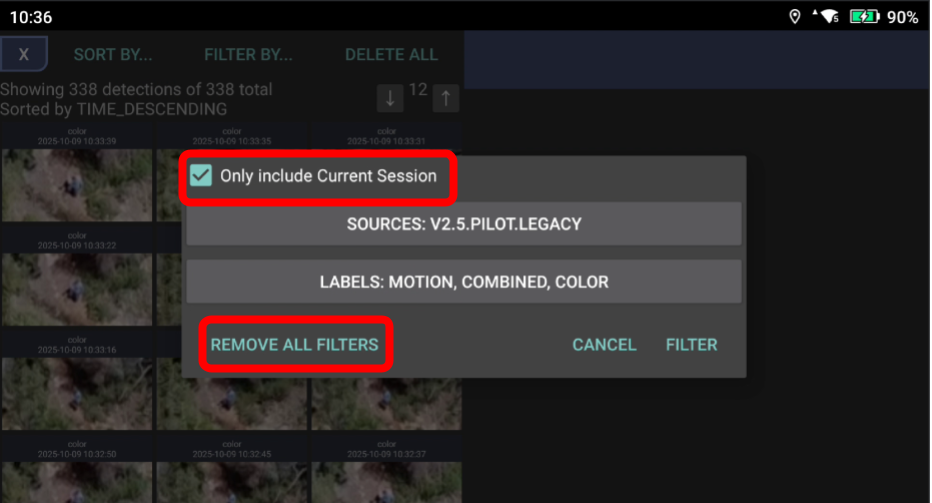
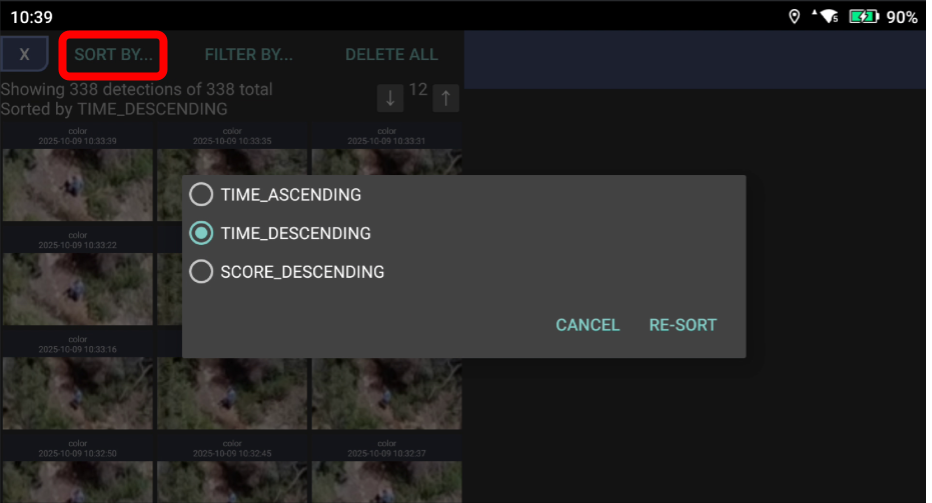
Note that filtering detections by session will reset if you shut down the app and restart. Detections can also be sorted by time and detection score.
Again, while detection review in Eagle Eyes Pilot is available, the recommended workflow for reviewing, analyzing, and exporting detections remains through Eagle Eyes Mirada on desktop. Development is underway to expand and improve in-app review options in future releases.
Using the Eagle Eyes Pilot Beta app does not compromise the drone's core flight systems or safety.
Eagle Eyes Pilot is built using DJI's official Software Development Kit (SDK) and runs as a standalone piloting app. It does not modify or replace the drone's firmware or hardware. All flight-critical functions, including GPS positioning, obstacle avoidance, stability, and return-to-home, remain under the control of DJI's signed firmware on the drone.
Even if the Eagle Eyes app were to freeze or be force-closed mid-flight, the drone would continue flying safely under DJI's control. You can also switch between Eagle Eyes Pilot and DJI Pilot 2 during flight, or run them side-by-side.
The two versions of our app:
STABLE
BETA
If you're concerned about risk, we recommend using the stable version for operations and installing the beta separately for testing new tools. You can run both the Beta and Stable versions of Eagle Eyes on the same device under a single license, since licensing is per device, not per app version. Download both here.
The exact workings are difficult to describe in plain English, but here's the gist of it.
The system detects objects based on colour or motion.
For colour, the detector looks for small patches of unusually coloured pixels. The more frequently a colour appears in the image, the less it's considered as a candidate for detection. The ideal target for the colour detector is a small cluster of pixels with a colour that stands out from the rest of the scene.
For motion, the system looks for isolated moving objects when the rest of the frame is stationary. Motion-based detections should not occur when the drone itself is moving, although small, distinct movements (like a bird against the sky or an object drifting on calm water) can still register.
Colour and motion may combine to create a single, combined detection.
The detector identifies up to three of the most unusual objects in each frame based on colour, motion, or a mix of both. Each detection is assigned a score from 0 (not significant) to 1 (highly significant). A detection appears on screen if its score is, or has ever been, above 0.5. Lower-scored detections are still logged and can be viewed later in Hypersensitive (H) Mode.
While many modern drones, such as those in the DJI Mavic 4 series, now feature AI object detection systems based on shape recognition, these rely on seeing a full or nearly full view of an object before triggering a detection. In many search and rescue or public safety scenarios, however, the most critical signs are not full shapes but subtle, almost imperceptible flashes of colour or slight movements partially obscured by terrain or vegetation. Those are the moments most likely to be missed by the human eye, and that's where the Eagle Eyes system excels.
Eagle Eyes computer vision also differs from other colour anomaly detection systems in that it's built for real-time detection, specifically designed to fit into the operational workflow for search and rescue and public safety teams who need immediate situational awareness while flying.
Walkthrough of demo cases in Eagle Eyes Scan (our previous desktop app).
Examples of the Eagle Eyes detector in action.
Eagle Eyes uses color and motion analysis to highlight small areas ("blobs") that stand out from their surroundings. This method works well when there's strong color contrast between the subject and the background, for example, bright clothing against darker terrain, but it's not foolproof.
At times, the detector may highlight objects that aren't important (false positives) or miss objects that are (false negatives). Brightly coloured or moving leaves can sometimes trigger detections. Shadows, glare, and low contrast can also make detection more difficult.
The system identifies up to three anomalies per frame, so if there are many visually distinct or moving objects in the scene, it may prioritize those instead of the targets you care about.
The main thing to keep in mind is that the detector is there to assist your own observation, to draw your attention to possible clues, not to replace what you see yourself.
Other relevant questions:
In general - we try not to give advice on how to fly the drone - because it depends too much on context and environmental factors (tree canopy, slope, subject condition, pilot/spotter experience, team workflow etc.), and is best left to the local search team to decide. We simply suggest flying the drone in the same way you would as if you were looking for the person by eye. The detection system is just an assistant - it is still the human pilot/spotter who is primarily responsible for finding the subject.
In Brief…
That said - if we're forced to say one mode of flight that works well overall: 50m high, camera pitched 70° down, moving slowly enough to avoid blur (depends on light conditions). Briefly stopping every 15s to detect possible motion.
Don't just take our word for it. Here are a few additional resources you might find useful.
The CalAIR (California Aerial Incident Response) Drone Operations Manual was created with input from several SAR teams across California, and is one of the most complete pieces of documentation for drone SAR that exists today. It covers regulations and compliance, training, personnel and ICS integration, aviation best practices, equipment, search methodology, and flight operations.
There have been a few studies on how to most effectively locate missing persons by drone. One we recommend is the OFS method proposed by the Danish Emergency Management Agency (DEMA). You can find Slides, Action Cards, and Test Sheet. In brief, the OFS method involves a sequence of 3 phases:
More details on Page 7 of the Action Cards.
The Norwegian police drone search approach pairs data-driven SAR planning (the "bike-wheel" model) with task-specific drone tactics. A 75° gimbal, ~100 m AGL, thermal-first sensing and six standardized search patterns (GLS, PS, SS variants). To maximize probability of detection while keeping searches fast and repeatable.
Taking pictures at various angles can increase the chances of spotting a subject, especially in environments where trees, terrain, or shadows might hide something from a straight-down view. Here is a short video from one of our users showing how Eagle Eyes was used on a mission flown with Smart Oblique (5-Way Oblique) Capture.
The following video shows how to toggle the on-screen display overlays on and off in both DJI Pilot 2 and Eagle Eyes Pilot to get a clean HDMI output, for feeding into Eagle Eyes Mirada or an external monitor.
In DJI Pilot 2:
In Eagle Eyes Pilot:
When Clean HDMI Output is enabled, the video signal coming from your RC Pro controller will be free of any on-screen display elements, giving you a pure video feed ready for use in Eagle Eyes Mirada or any HDMI display setup.
Eagle Eyes Mirada shows the coordinates for each of the detections. The coordinates shown correspond to the drone's position at the time the image associated with each detection was captured.
How you access these coordinates depends on how your data is being ingested:
Processing recorded DJI MP4 files:
If you're processing MP4 files from DJI drones, make sure "Subtitle" recording is turned on in DJI Pilot 2 (as shown below). This creates .SRT files alongside the video. Import your footage into Eagle Eyes Mirada with "+" → Load Folder or Sync from SD Card and Mirada automatically pairs each .SRT with its video: this enables per-frame GPS coordinates. (If you import individual files with Load Files, select both the MP4 and the matching SRT.) Some newer models, like the Matrice 4 series, embed the telemetry inside the MP4 file instead: Mirada reads that directly, no .SRT needed (see Matrice 4 series geolocation).
This video shows our previous desktop app, Eagle Eyes Scan, which has been replaced by Mirada. The DJI Pilot 2 caption settings are unchanged, and the same import steps apply in Mirada.
Running live detection over HDMI:
If you're running live detection via an HDMI cable, run Eagle Eyes Pilot on the drone controller and make sure your laptop and the controller are on the same Wi-Fi network. This allows Eagle Eyes Mirada to pick up live drone coordinates during the livestream.
This video shows Eagle Eyes Pilot with our previous desktop app, Eagle Eyes Scan. The setup works the same with Mirada.
Here is how loading drone data into Mirada looks, with metadata and coordinates read automatically:
Loading data into Mirada.
Drones without telemetry files: Eagle Eyes Mirada does not yet support importing separate flight records (such as CSV flight logs) to add coordinates to videos that were recorded without telemetry.
In the end, you should see the coordinates for each detection, and clicking them lets you copy the coordinates in various formats.
Eagle Eyes Pilot has a setting to recalibrate and re-center the gimbal.
.png)
.png)
.png)
Yes, Eagle Eyes Pilot allows you to send full-resolution drone photos from the drone down to the controller and view them on the controller and/or add them to your Caltopo map as a geolocated photo point while your drone is still in flight. It is also possible to run the detector on those full resolution photos on the drone controller in EE Pilot to show all detections on the image.
To do this (see video below):
Note: Eagle Eyes Pilot is not designed for reviewing images, it's intended for real-time detection during flight. This workflow is not optimized for post-capture image review, so you can expect a high number of false positives when viewing detections this way.
We are currently developing an refined workflow for this type of use case.
It is also possible to review past detections directly in Eagle Eyes Pilot, although this is not the recommended workflow. To learn more about reviewing detections, refer to the Reviewing Detections FAQ.
See detailed instructions in the 📘 Eagle Eyes Pilot Manual.
Eagle Eyes Mirada uses the same licenses and device slots as the rest of Eagle Eyes. If you have a license that you used for Eagle Eyes Scan, it works for Mirada too. Many Mirada features work without a license; you need one to run the Eagle Eyes detector.
License activation applies to the desktop app. The Mirada web app runs in your browser and does not need device activation.
🗄️ Legacy FAQ: this answer is about Eagle Eyes Scan, our previous desktop app, and is kept here for teams still using Scan. Scan has been replaced by Eagle Eyes Mirada. See What is Eagle Eyes Mirada?
Contents
→ Activation instructions for Eagle Eyes Scan 1.1.2 and up
→ Activation instructions for Eagle Eyes Scan 0.5.3
Activation instructions for Eagle Eyes Scan 1.1.2 and up
Follow the activation instructions as shown in the first few minutes of this video:
Activation instructions for Eagle Eyes Scan 0.5.3
To activate your Eagle Eyes License for Eagle Eyes Scan on your laptop follow the instructions outlined in this video:
Please note:
Screenshot from Scan license activation window:
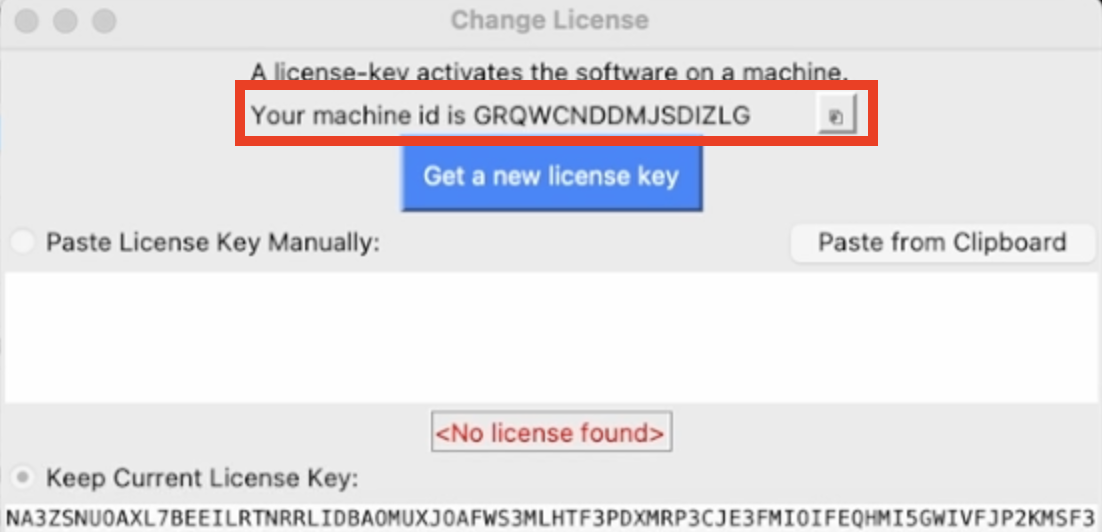
Screenshot from the licensing flow on the Eagle Eyes account page:
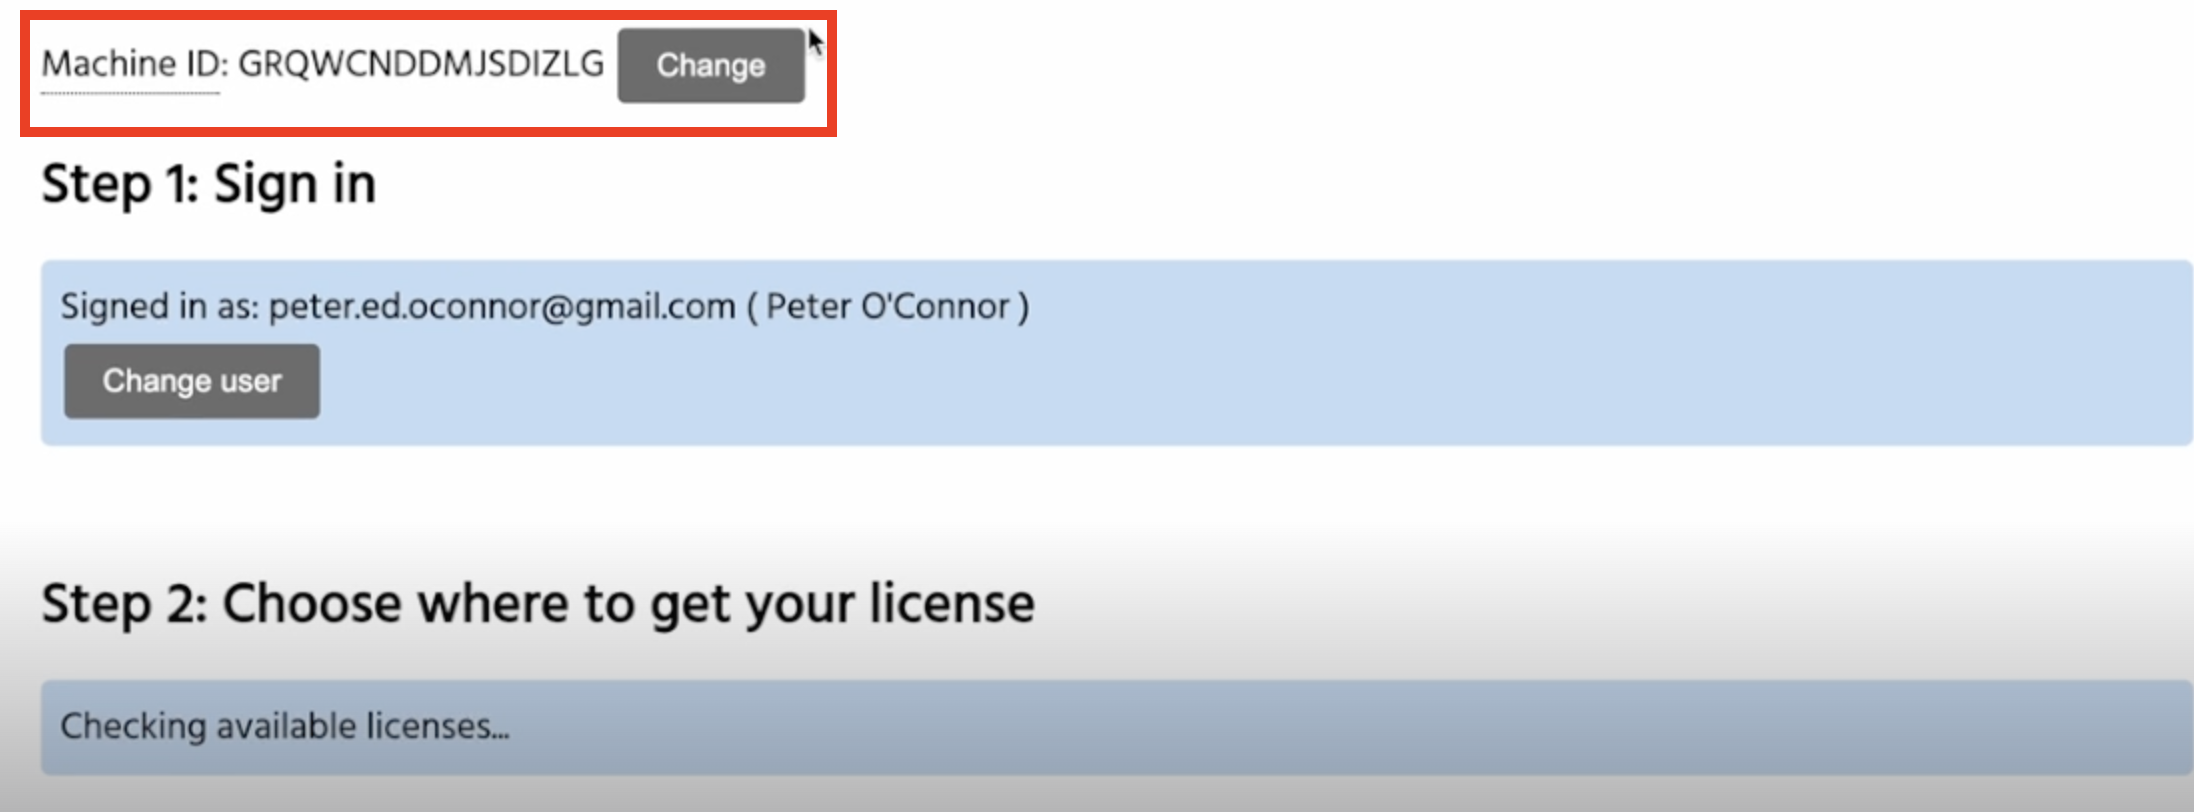
At the bottom of the license activation web page, copy the resulting key (200+ characters) back into Scan via "paste from clipboard".
For more information see the Eagle Eyes Scan user manual.
Refer to our Setup instructions For Comprehensive details on how to download Eagle Eyes Pilot onto your drone controller. Activate your license. and configure Controller settings.
Starting the activation process:
Activating your license (QR code method):
Troubleshooting (manual activation):
If you don't have a device with a camera or the QR scan doesn't work:
⏱ Important: Complete the activation process within 15 minutes. Each activation session times out after that period.
Connecting to CalTopo is optional. Separate from Eagle Eyes, CalTopo (also known as SARTopo) is already a great application for mapping and team situational awareness. If you have not tried it yet, we recommend creating an account and trying it out together with Eagle Eyes.
Connecting Eagle Eyes with CalTopo means everyone with access to the CalTopo map can see the drone's flight tracks and real-time location, and the drone pilot can fly with reference to the CalTopo map.
There are two ways to connect Eagle Eyes Pilot to CalTopo:
Option 1: Browser login. Quick, but temporary.
Option 2: CalTopo Service Account. A permanent login (recommended).
This gets you onto a CalTopo map for the current session. It is the quickest way to start, but the login is temporary, so you may need to sign in again later.
A Service Account gives your whole team a permanent login to CalTopo on the controller, so nobody has to sign in again before a search. You set it up once per team, and from then on a new controller goes from a fresh install to fully set up in under a minute. The video below walks through the whole process.
To set up a Service Account, you need:
This is a one-off. Once it is done, future team members only scan a QR code and pick the existing configuration.
On the controller
On your laptop, in CalTopo (you must be a team admin)
Back on the controller
Once your team has a Service Account connected through its license, new team members do not repeat the CalTopo steps. On a fresh install they grant permissions, name the drone, scan the QR code to activate the license, and pick the existing configuration. The permanent CalTopo login comes with it, and they are ready to fly. First time painful, second time not so bad.
Yes, from within the Eagle Eyes Pilot app, this can be done even when flying offline. Your drone can be flown using either Eagle Eyes Pilot or DJI Pilot 2. Eagle Eyes Pilot automatically reads the DJI flight logs stored on your drone controller. Once you're back online, in just a few clicks, you can upload your drone's GPS tracks from that offline flight directly to your CalTopo map.
This feature is available for free and does not require a license. Note that real-time tracking to CalTopo does require a paid license, but offline tracking and seamlessly uploading recorded tracks remain free for all users.
Note: You can also download offline base maps from CalTopo and load them into Eagle Eyes so you have reliable reference maps when flying offline. This works by downloading MBTiles from CalTopo and uploading them into Eagle Eyes Pilot, allowing the map tiles to be stored directly on your controller for use without an internet connection.
Yes, as of Eagle Eyes Pilot 1.5.0, flights made with Eagle Eyes Pilot sync to Airdata.
Details:
The flight-logs are copied to the DJI-Log folder upon startup of Eagle Eyes Pilot. You can also manually copy them over from the Flight Logs menu on the home screen. Airdata will then sync them to the cloud.
Note: It normally takes a few minutes from the time your flight is done to the time it shows up in Airdata. If you are not on the internet, flight logs will sync after you reconnect.
The easiest way is with the pin/camera icon under the map on the right side of the Pilot app view:
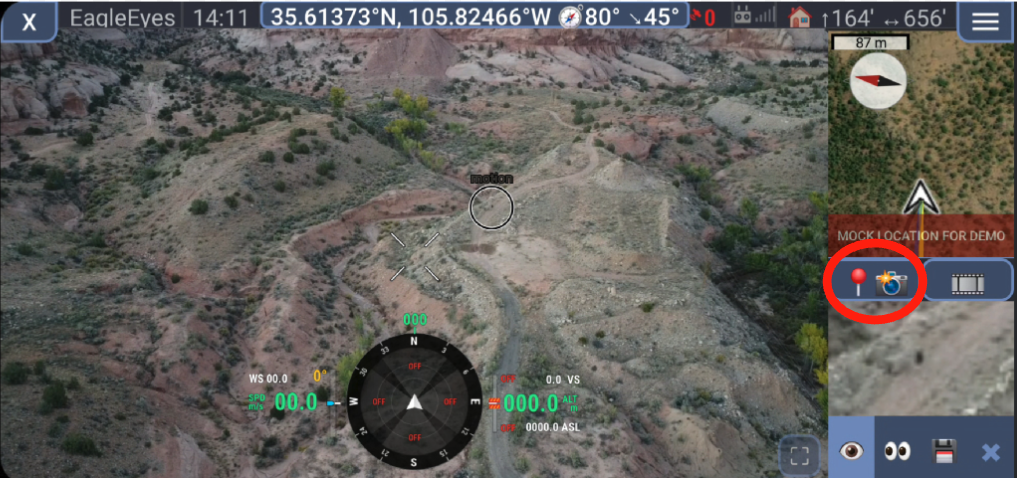
Tap it and a dialog will pop up.
By default, "Capture View" is selected. Open the dropdown and choose No photo, just add a marker.
.png)
Tap Capture then OK, and a marker will save at your current location.
.png)
If your drone has a laser rangefinder:
.png)
With "Mark object using laser measurement" toggled ON, the marker drops at the laser strike point.
With it OFF, the marker saves at the drone's current location.
.png)
To return to a saved point after swapping batteries:
The app is available for download through our website and not available on the app store. iOS users (IPhones, IPads): Sorry - DJI has abandoned iOS - so we do not have plans to support it for Eagle Eyes Pilot. Our desktop app Eagle Eyes Mirada however runs on Mac and Windows computers, and also in the browser as a web app (find more details here).
The fastest and recommended method is via credit card on our website:
If you can't pay by credit card and need an invoice, we can provide one and accept payment by wire transfer. Just reach out to info@EagleEyesSearch.com to request it.
To add more devices to your existing account, go to your account page and click the "Buy more devices for this license" button under the active license you would like to add to. See the red circled box in the image below.
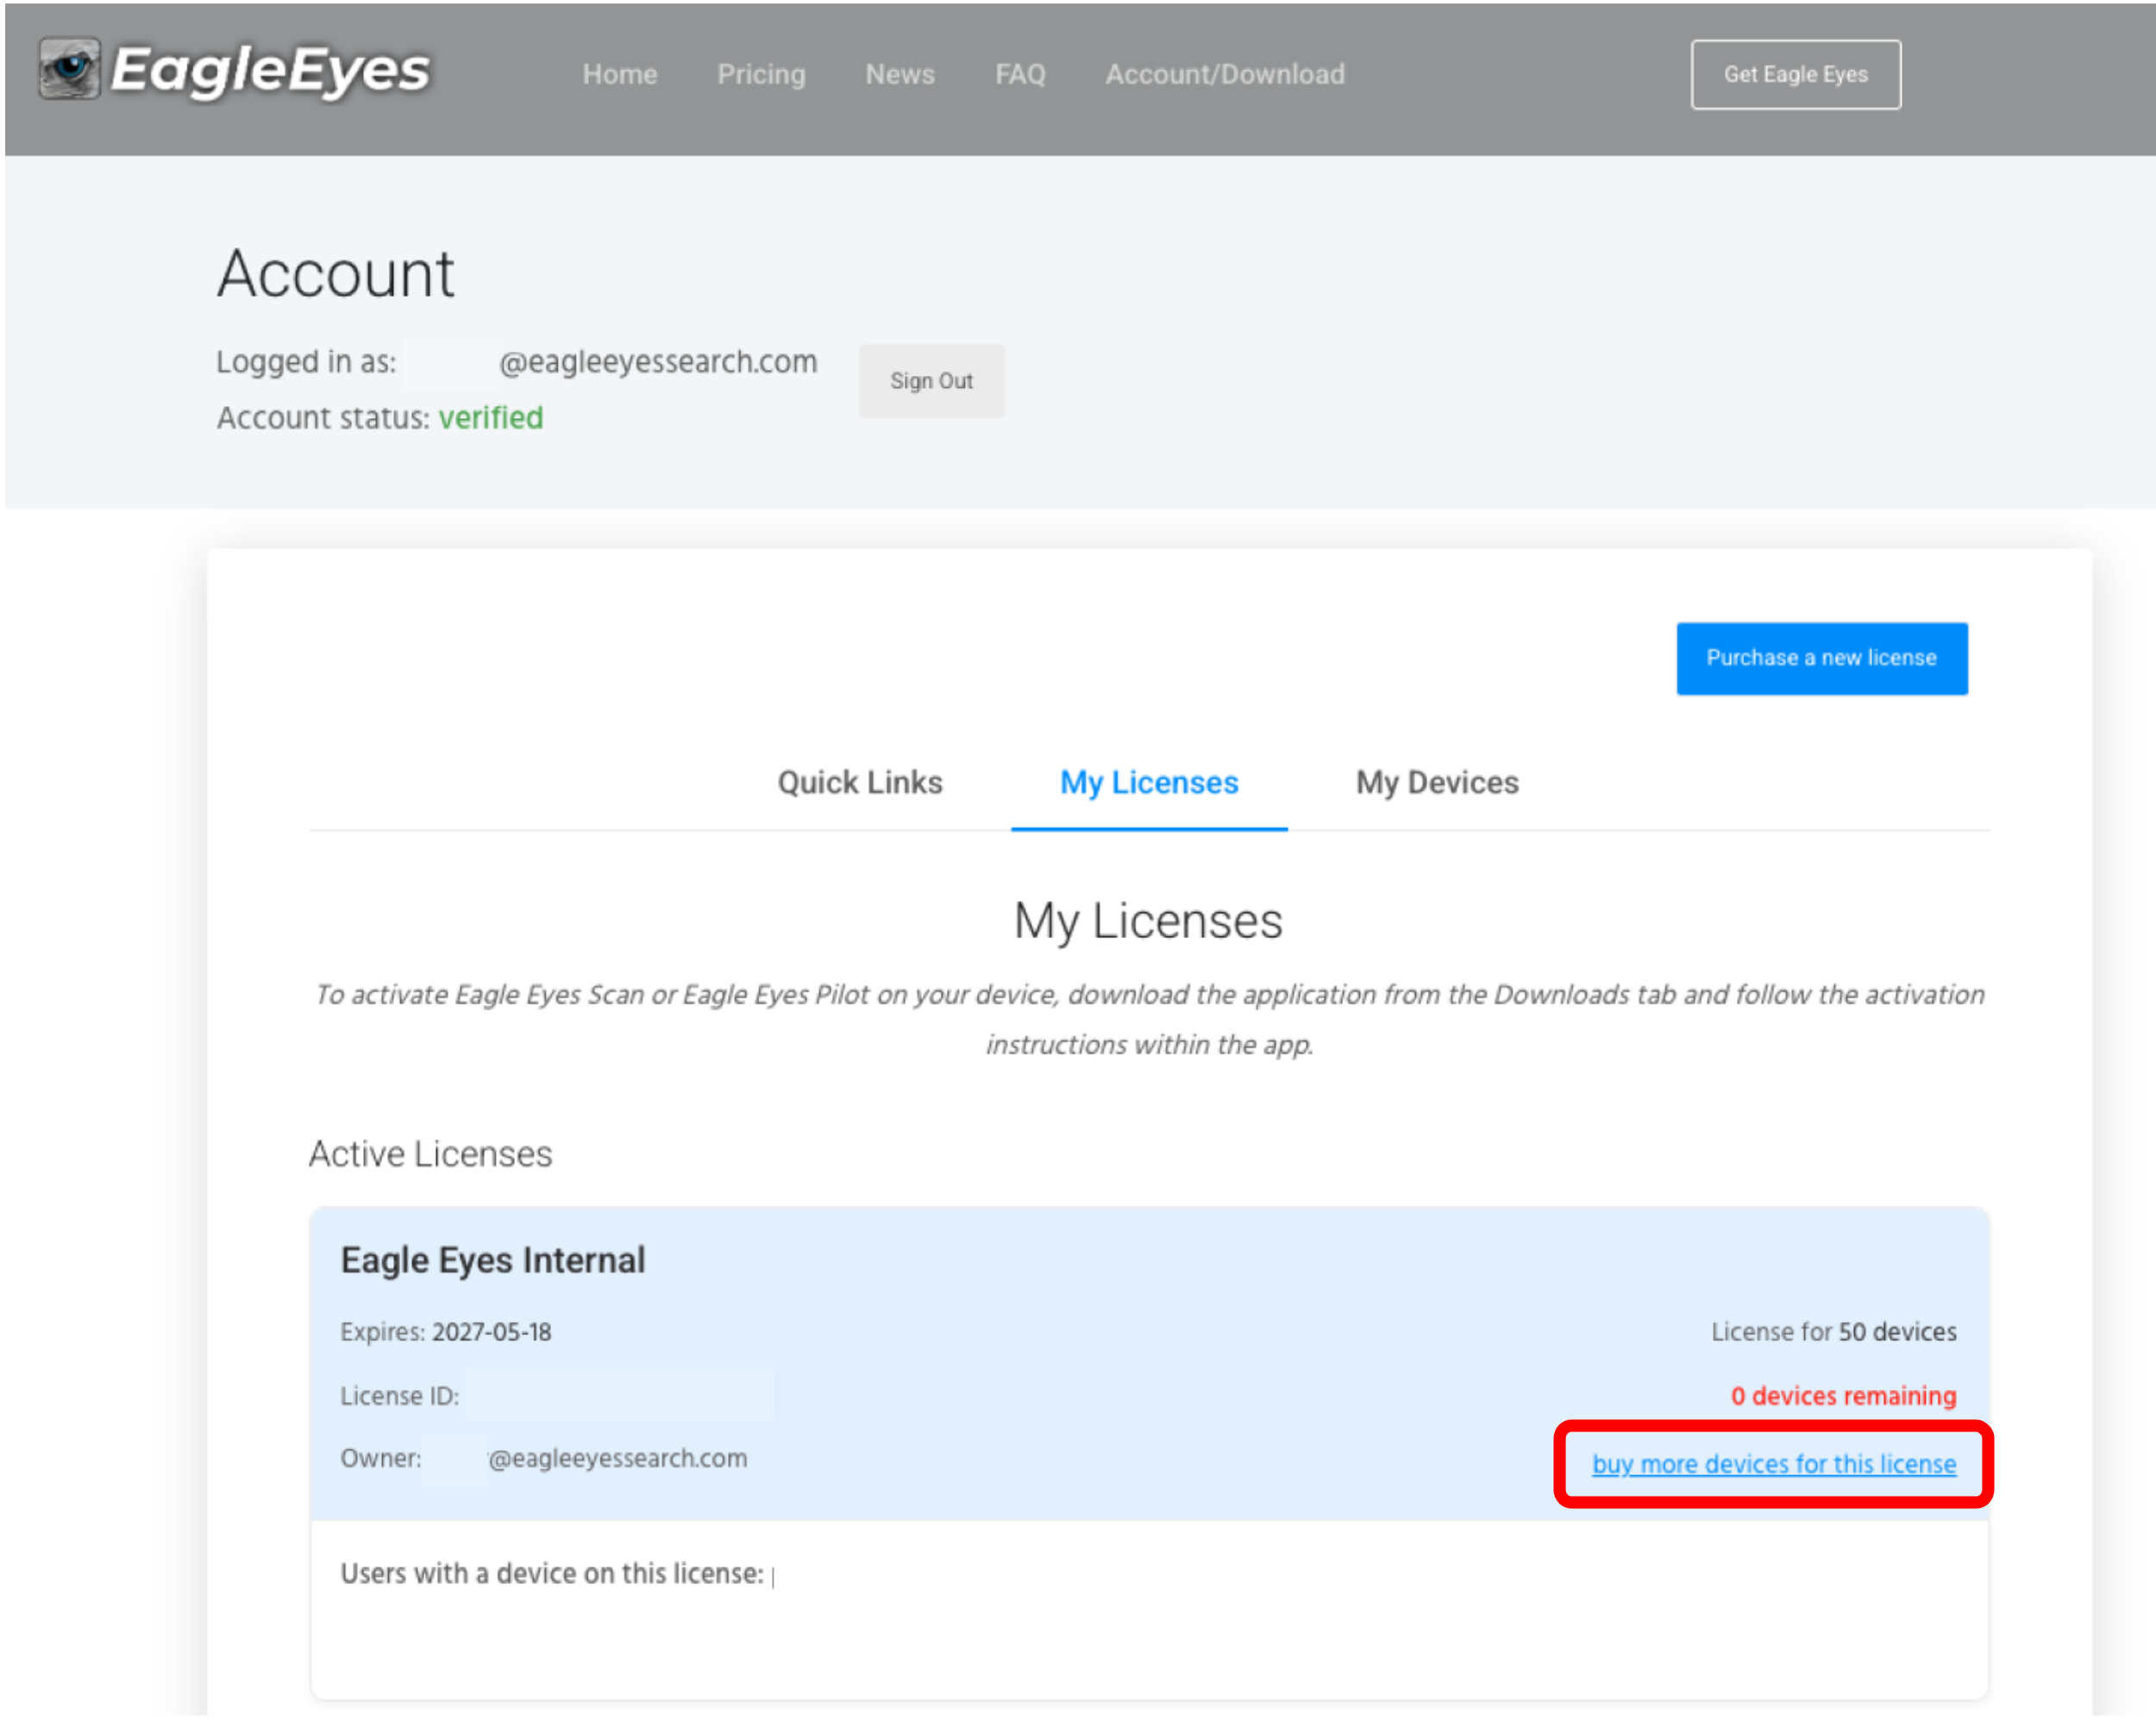
Additional devices can be added at any time for a one-time fee of $20 for each month remaining in your current license term. For example, if you have 3 months left, the cost would be $60. See our pricing page for more details.
You can view our full privacy policy here. In short: your data always stays local, under your control, and is never uploaded to our servers.
Some DJI drone models, including the Matrice 4 series, do not generate separate .SRT files alongside video files when video captions are enabled. Instead, the geolocation and drone telemetry data is embedded directly within the MP4 video file itself.
Eagle Eyes Mirada reads this embedded telemetry directly: load your Matrice 4 series videos and the geolocation data is picked up with no extra steps.
If you are still using our previous desktop app, Eagle Eyes Scan: Scan can only read geolocation data from standalone .SRT files. Use our DJI SRT Converter tool to extract the telemetry from your MP4 files and generate a standard .SRT file that you can then load into Scan alongside the video.
Thanks to Malcolm for support with this tool.
Contact us at info@EagleEyesSearch.com